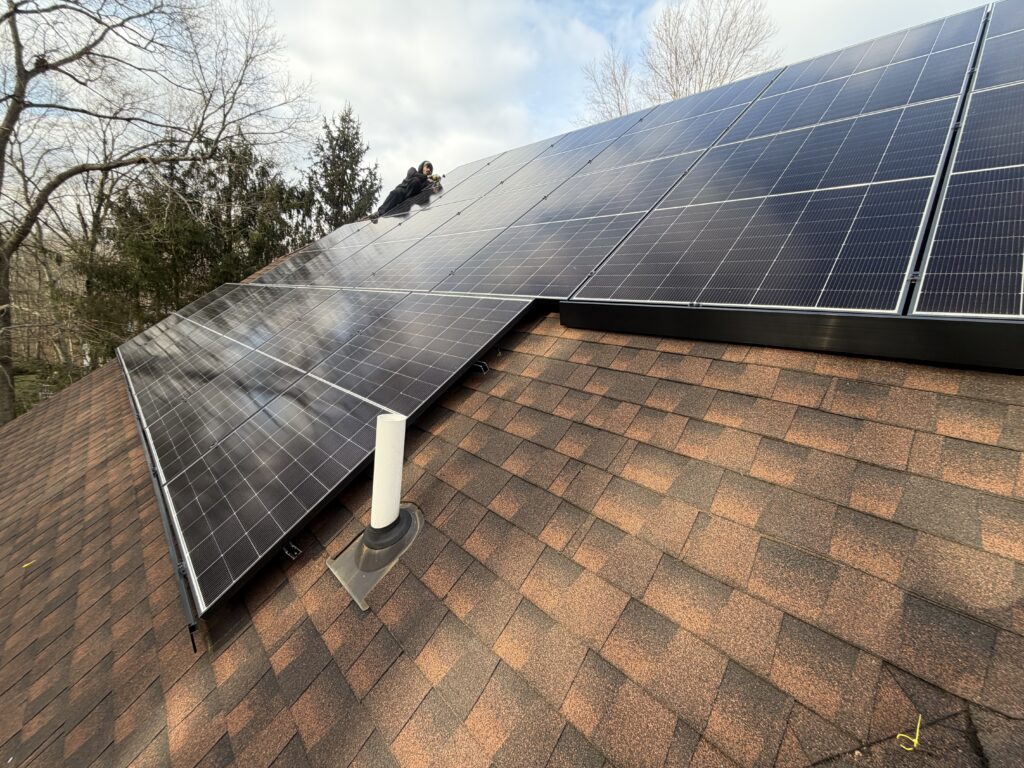
 Composition shingle solar mounting best practices come down to precise layout, clean seating, and shingle-safe sealants that keep the roof’s water path intact, without relying on additional flashing.
This guide is purely descriptive so crews can follow a safe, repeatable sequence and reduce callbacks. For spacing and hardware decisions, use TRT’s certified span tables and request stamped calculations for your project.
| TL;DRFor TRT01 and TRT02, no flashing is required, no pilot holes are needed, and silicone sealants must not be used with butyl.Use only compatible roofing sealants on clean, dry surfaces. Follow QA documentation and ensure consistent torque without crushing shingles.UL 2703 governs PV mounting systems for bonding, mechanical load, and fire classification (UL PV Mounting Systems Certification) |
CTA: Request Stamped Calcs for Your Project
Why Composition Shingle Roofs Reward Good Process
Composition shingles are forgiving, but the system depends on laps, adhesive strips, and gravity. When a penetration respects that design, water moves down and off the roof with no opportunity to reverse course.
When a penetration short cuts the sequence, water can travel laterally, stall at a seam, or wick through a cut edge. Most leaks reported after solar come from small process slips, not from damaged materials. That is why consistent steps, simple tools, and a repeatable QA flow save the most time.
The Three Places Teams Get Into Trouble
1. The pilot and the substrate
For TRT01 and TRT02, no drill pilot holes are required.
Mark carefully, align hardware squarely, and verify you hit the right member or approved deck area. Photograph that moment. It is proof for the inspector and peace of mind for the owner.
2) Mount seating & water path
Leaks often start from small details, an uneven base, trapped granules, or an exposed fastener. Before fastening, brush the area clean and make sure the base sits flat with full contact.
Level the mount carefully and check each corner for debris or lift that could interrupt the seal or shift the mount over time.
Once everything is secure, look for clean lines and a smooth finish. Keep hardware out of the water path and confirm there are no exposed threads or low spots that could collect moisture. After closure, do a quick visual or light water test to confirm runoff flows cleanly with no pooling or uphill edges.
Building codes require that roof penetrations are properly flashed and sealed to maintain weather protection, as outlined in the International Residential Code for roof assemblies.
3. Sealant Used As A Supplement, Not A Substitute
Sealant is a helper, not the main act. It fills tiny gaps and bonds disturbed tabs. It does not replace a correct flashing sequence.
Use a roofing sealant compatible with asphalt shingles and underlayments, but remember:
Do not use silicone sealant with TRT01/02. The butyl in these systems is incompatible with silicone.
Apply sealant only within its temperature window and on a dry surface. Note the lot code on your QA sheet.
Step-By-Step Sequence That Crews Can Follow
- Confirm the layout
Start with the approved plan set and roof-zone awareness. Spacing and attachment come from TRT span tables and your stamped calcs, no field guesses.
- Locate the attachment point
Find the rafter using a stud finder, visual cues, or interior measurements. Mark square to the eave so mounts sit straight and modules line up cleanly. For system specifics, see TRT-01 and TRT-02.
- Lift the upper course gently
You don’t need to lift shingles here. Keep tabs bonded and the area clean; if a tab loosens, lift only as needed and re-bond with a compatible butyl-based roofing sealant (no silicone).
- Pilot holes
Not required for TRT01/02. Align the mount carefully so hardware engages squarely with the substrate, then proceed per stamped calcs. This keeps the roof surface tidy and reduces install time.
- Prepare the surface
Make sure the surface is dry and free of granules or debris. If your workflow calls for it, apply a thin ring of butyl-based roofing sealant sparingly, never silicone. Clean contact improves adhesion and long-term performance.
- Place the mount
Set the base square and flush with full contact, no trapped grit. For TRT-01, confirm the base sits perfectly flat; for TRT-02, make sure nothing interrupts shedding and no fasteners sit in the water path. A true, flat seat prevents twist during alignment.
- Drive the hardware
Tighten gradually and evenly until secure without crushing shingles. If washers are included, seat them flat and level. Follow torque values from your stamped calculations to avoid over- or under-tightening.
- Re-bond any lifted tabs
If a tab was disturbed, add a small dab of compatible butyl-based sealant and press it back into place. Wipe away any squeeze-out for a clean finish. This keeps the roof surface smooth and prevents capillary creep.
- Confirm the water path
Do a quick visual or light water check. Runoff should move cleanly with no pooling or uphill edges. A 30-second check here saves callbacks later.
- Document the work
Photograph location, mount placement, and the finished assembly. Log kit details, torque notes, and sealant lot codes; reference the permit guide for what inspectors expect. Good records speed inspection and protect warranties.
Installation Details That Make Inspections Easy
Inspectors look for consistency, clean workmanship, and predictable water management.
They want to see mounts seated flat, sealant properly applied, and all shingles neatly re-bonded. These details show the system is watertight even without extra layers or components.
A tidy finish with no exposed fasteners or lifted tabs helps inspections go faster and builds confidence in the quality of your installation.
What To Document On Every Penetration
Documentation is not busywork. It is the story of what you built. When you attach photos and simple notes to each penetration, you remove uncertainty for the AHJ, the owner, and your future self.
Table. Per-penetration log items
| Item to capture | Why it matters | Proof to attach |
| Roof area and array position | Locates the attachment for service | Grid reference on plan, quick photo |
| Substrate confirmation | Shows you hit the member or approved deck | Pilot photo, caption on log |
| Hardware set | Shows mount is square and seated evenly | Photo before and after closure |
| Sealant product and lot | Confirms compatibility and traceability | Photo of tube, lot noted on sheet |
| Crew initials and time | Assigns responsibility and sequence | QA sheet line item |
| Tool check | Notes that equipment was in good condition | Driver model and check date |
Product Spec Box
TRT01 Rail-less Comp Shingle
Roof type: composition shingle
Certification: UL 2703
Typical spacing note: use TRT certified span table for your project
Module frame compatibility: see TRT01 installation guide (PDF, v3.3, 06/18/2025)
Learn More: TRT01 product hub
TRT02 Rail Comp Shingle
Roof type: composition shingle
Certification: UL 2703
Typical spacing note: use TRT certified span table for your project
Module frame compatibility: see TRT02 installation guide (PDF)
Learn More: TRT02 product hub
FAQs
What torque should I use on lag bolts?
Use the values in your stamped calculations and in the notes that accompany the TRT span tables for your project. Hardware should be seated firmly and evenly without crushing shingles. Record your readings on the QA sheet.
Can I install in light rain or in cold weather?
Avoid wet substrates and active rain. In cold conditions, lift tabs carefully and keep sealants warm and within their temperature window. Plan work so surfaces are clean and dry before you close the roof.
Which sealants are compatible with common shingles?
Use a butyl-based roofing sealant that clearly lists compatibility with asphalt shingles and common underlayments. Do not use silicone with TRT01/02. Apply on a clean, dry surface within the product’s temperature range, and use it as a helper for re-bonding tabs and sealing minor gaps, not as the primary waterproofing method.